A Guide to Formatting
|
A Guide to Formatting
|
|||||||||
|---|---|---|---|---|---|---|---|---|---|
|
Posted 2021-07-28 21:38:08 (edited)
A Guide to Formatting with HTML & CSS
While we will not go into every intricacy of HTML or CSS (there are plenty of guides for that around the Internet), we will give a cursory look into how you can take advantage of them here on Wolvden and also share some useful tidbits that you can use in your posts, profiles, and wolf bios. Why was the old editor removed?The old WYSIWYG ("What You See Is What You Get") editor had many problems, one of which being that it didn't always actually give you what you saw in the live preview. You can see many of the complaints in the Text Editor Master Post bug report. Another issue being that it added a lot of extra code that it didn't need, and in many cases would cause formatting to not save properly. A slightly more in depth explanation for its removal can be found here. How can I edit my post/bio/profile now?Making posts, editing bios, and updating profiles doesn't have to be scary. For those of you that look at your old content and see what is essentially a giant block of text, this is not how code should be. As noted above, this is a result of the old editor.  To make it easier to read the code leftover from the previous editor, we have added in a new button that can be used to try to automatically clean up some of the old formatting. Please keep in mind that this will not fix all issues, but will attempt to at least make the code more readable. To give an example, the old editor would take 41 characters to make a selection of text bold. There is no reason for it to be that complex. So when editing your content by hand, if you see Another option for trying to salvage your existing code is to paste it into a tool such as this HTML Editor and clicking the "Clean" option.
There is also nothing wrong with using a 3rd party HTML/WYSIWYG editor to generate the HTML for your content, and then pasting it into Wolvden to use. Just be sure to use the "Preview" button to see how it will actually look on site. There are unfortunately too many complexities with these types of editors to realistically support an accurate live "WYSIWYG" view of how the content will appear, especially when factoring in the formatting issues they bring. What if I just want to write basic text?Nothing says you have to use any of the formatting tools in the bar. In fact, you can just type text and as long as you have "Preserve line breaks" enabled, all your Enter key presses will show up exactly like that when you post. Same for your den, profile, and wolf bios. As long as you can press Enter or insert a "newline", your posts will work just the same as before. Managing your den & profilePreviously, when adding CSS to your layouts, it would be done via a tag that looks like this: Now, instead of adding extra HTML to your layout, you can drop that same link into a CSS field on your den or profile. This makes it quicker and easier to add or replace CSS files without the need to update your HTML.
Useful classesText alignment
These classes can be used on any of the main container tags ( Example<div class="text-center">This div will have its text centered!</div>
SpacingSpacing elements can be achieved with a variety of shorthand classes, allowing you to target individual sides as well as entire elements. The names of these classes use the following format: Property:
Sides:
Size ranges from 0 (remove Padding examplesp-0 p-1 p-2 p-3 p-4 p-5 px-5 py-5 pb-3 pt-3 pl-5 Margin examplesm-0 m-1 m-2 m-3 m-4 m-5 ml-3 mr-3 mt-3 ml-5 As demonstrated above, these classes can be combined with each other to achieve compound styling. These are shorter than using the equivalent Rows & columnsWhile tables are valid and can be used, they aren't the most practical when it comes to mobile viewing. The site itself is built upon a grid system made up of 12 columns. You can take advantage of these row & column classes in your layouts (including posts). They function in a similar manner to tables, but collapse more efficiently on smaller screens. Without going into too much detail, the basis for this setup looks like the following:
<div class="row">
    <div class="col-4 border">col-4 (33%)</div>
    <div class="col-4 border">col-4 (33%)</div>
    <div class="col-4 border">col-4 (33%)</div>
</div>
<div class="row">
    <div class="col-6 border">col-6 (50%)</div>
    <div class="col-6 border">col-6 (50%)</div>
</div>
<div class="row">
    <div class="col-12 border">col-12 (100%)</div>
</div>
<div class="row">
    <div class="col-7 border">col-7 (~58%)</div>
    <div class="col-5 border">col-5 (~42%)</div>
</div>
col-4 (~33%)col-4 (~33%)col-4 (~33%)col-6 (50%)col-6 (50%)col-12 (100%)col-7 (~58%)col-5 (~42%)These column classes range from Going back to the mention of mobile view earlier, there are also special breakpoints that allow you to have columns dynamically size based on the width of the device/browser window. For a much more in depth resource on how to take advantage of this, please check the further reading below. Further ReadingInline stylingAs stated in the beginning, we will not be going into every minor detail of CSS and all of the available styling that can be achieved. There are numerous guides that go much more in depth than we ever could. For those of you unfamiliar with what inline styling is: inline styling allows you to add CSS directly to an element in order to achieve a specific effect. Some of the more common uses include setting the size, color, or font of text. While we do not recommend using different fonts or colors in the forums, you are more than welcome to mix it up on your den, profile, and wolf bios. The reason it is not recommended to change text colors in the forum is that, while your thread may be easy to read on the theme you are using, someone else may be using a different theme which causes the color to be lost in the background. This is why the buttons to change colors were not carried over from the old editor. Basic examples<span style="font-size: 24px;"></span><span style="font-size: 18px;"></span><span style="font-size: 14px;"></span>
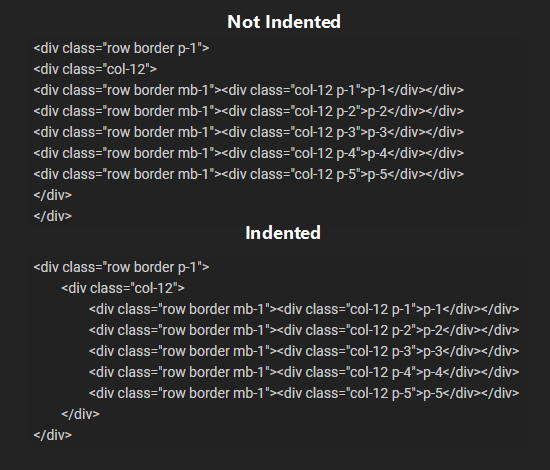
Further readingFor more information on styling, check out Mozilla's Fundamental text and font styling. While the documentation itself is written for stylesheets, the content also applies to inline styling. They provide a wealth of information, so be sure to check out some of their other guides as well. All of this information can be used when building your den & profile pages via stylesheets. Tips & tricksTab indentingFor areas that support it, you will see an option for "Use tab indenting". Normally the Tab key will move your selection between form elements. When the "Use tab indenting" option is enabled, you will instead be able to use the Tab key to insert tab characters in your code. Additionally, if you select one or more lines of text, you can press Tab to indent those selected lines. Conversely, if you press Shift+Tab you can unindent those lines. Tab indenting your text can make it easier to read nested code. For example: Linking to headersIf you notice in this guide, there is a sort of "Table of Contents" at the top of this post. To link to specific sections of a post requires two key elements. First, you need a tag with an ID attribute added to it. Second, you need a specially formatted link which will direct users to your desired section. Keep in mind that an ID must be unique, otherwise your link will only ever go to the first instance on the page. To use the Table of Contents from this guide as an example, this particular section has the following code (take note of the underlined ID that is used): The code to create a link to this section looks exactly as follows: Custom spoiler textThis is a short one, but some people may find it handy. Spoiler buttons can have custom text instead of just using the default "Spoiler". To do this, simply add For example, The following characters are able to be used in spoiler button text:
Select text to apply codeOne not so obvious feature of the editor is that you can apply code to selected text. By default, if you press one of the editor buttons (or use its keyboard shortcut), it will insert the HTML and move your cursor to the point where you can edit the code. If you first select some text, and then press a button (or use its shortcut), the code will be applied around that text. This is especially useful if you select an image or link URL, then press the appropriate button (Image or Link), as it will automatically turn that into valid HTML for you. In the case of links, you can then edit the text that says "link" to make your link read however you want. Another use for this is selecting a large amount of text and then using one of the text alignment buttons to set the alignment of the entire chunk of text. Themed CSS FilesAs mentioned in the news announcing the new editor, you can include themed CSS within a single stylesheet file. Any rules that are prefixed with This can be used to provide a more tailored experience for people viewing your den or profile. By building a dual-themed stylesheet, those using the Default theme could be given brighter, more contrasting colors, while those using the Dark theme could be shown a layout with darker, more muted colors. You can even separate them into two separate files if it makes it easier for you to manage. Example
	/**
	 * For people using Dark theme, display a dark red background, tables with a red
	 * background, and red text
	 */
	body.theme_dark {
		background: #500;
	}

	body.theme_dark table {
		background: #700;
		color: #F00;
	}

	/**
	 * For people using Default theme, display a light blue background, tables with a
	 * slightly darker blue background
	 */
	body.theme_default {
		background: #a2c2f3;
	}

	body.theme_default table {
		background: #426294;
	}
This is not a practical example. Don't use colors like that. Please. ChangelogMinor updates have been made to the text editor since it was released.
|
 #16 |
||||||||

|
Posted 2021-07-28 21:44:42
|
#16 |
|
Posted 2021-07-28 21:44:45
|
#16 |
|
Posted 2021-07-28 21:45:00
|
#16 |
|
Posted 2021-07-28 22:08:39
|
 [QUIT!!!!!] #10923 |
|
Posted 2021-07-29 02:36:54
|
 TNRwolf #7533 |
|
Posted 2021-07-29 03:44:35
And the "clean old formatting" button worked great when I tested it! Maybe consider having the "what if I want just basic text" part of this guide and the one on the "clean old formatting" button be more visible, for those of us who are upset and don't want to learn HTML, so it's the first thing they see? |
 Fal - semi hiatus #43456 |
|
Posted 2021-07-29 11:28:03
|
 Salem #6510 |
|
Posted 2021-07-29 11:32:24 (edited)
|
 Sigyn #14227 |
|
Posted 2021-07-29 11:36:43
|
Fal - semi hiatus #43456 |